Priročnik EMOS E5018 Vremenska postaja

Potrebujete priročnik za vaš EMOS E5018 Vremenska postaja? Spodaj si lahko brezplačno ogledate in prenesete PDF priročnik v slovenščini. Ta izdelek ima trenutno 5 pogosto zastavljeni vprašanji, 1 komentar in 12 glasov s povprečno oceno izdelka 67/100. Če to ni priročnik, ki ga želite, nas kontaktirajte.

Ali je vaš izdelek okvarjen in v priročniku ne najdete rešitve? Obiščite Repair Café za brezplačno popravilo.

Priročnik

Loading…

2
AOK-5018B WIRELESS WEATHER STATION
The weather station displays the time along with 2 alarm clocks with snooze function, the weather forecast, interior and exterior temperatures, humidity,
the atmospheric pressure, lunar phase, the sunrise and sunset times, and also the moonrise and moonset times.
It has a memory for the minimum and maximum measured values.
Please read this product guide thoroughly before using the device.
GB
Specications:
Radio controlled clock
Accuracy: ±2 °C
Interior/exterior temperatures: 0 °C to +50 °C; -50 °C to +70 °C
Temperature resolution: 0.1 °C
Wireless sensor: broadcast frequency 433 MHz
Radio signal range: up to 30 m in free space
Number of sensors: 3
Relative humidity: 20 % – 95 %
Resolution: 1 %
Accuracy: ±5 %
Barometer pressure scale: 850 hPa to 1050 hPa
Power supply:
a) main station: 2× 1.5 V AA battery (not included)
b) sensor: 2× 1.5 V AAA battery (not included)
Size and weight:
a) main station: 189 × 139 × 30 mm; 306 g (without batteries)
b) sensor: 60 × 99 × 21 mm; 43 g (without batteries)
List of icons and buttons
Front display
A – interior temperature below
+4 °C
B – weather forecast icon
C – pressure trend
D – depleted battery icon
E – exterior sensor number
F – temperature trend
G – humidity trend
H – exterior temperature and
humidity
I – interior temperature and
humidity
J – physical comfort icon
K – date, day of the week, week
number
L – DCF77 radio signal reception
icon
M – alarm clock icons
N – current time
O – moonrise and moonset
P – country and city code
R – sunrise and sunset
S – lunar phase icon
T – pressure value and history
Rear side
Button push Button hold (3 seconds)
CHANNEL Sensor number Search for sensor No. 1,2 3
HISTORY
Pressure history over the
last 12 hours
Setting of altitude above sea
level, pressure units, weather
icon
-
1 step back
Display temperatures in
°C or °F units
Thermal limit setting
+
1 step forward
Display max/min tem
-
perature and humidity
values
MODE Alarm time No. 1, 2
Setting the alarm, time and
date
RESET Erase all values
Upper side
SNOOZE/LIGHT – Display light and snooze functions
Wireless sensor
Front side
- external temperature
- external humidity
CH1,2,3 – No. of channel reserved for communication of the sensor with
the weather station
Rear side
CH – switching for sensor channel
°C/°F – temperature units
Commissioning
1. First insert the battery into the weather station (2× AA), then to the
wireless sensor (2× AAA). When installing the batteries, ensure correct
polarity to avoid damaging the weather station or the sensor. Use alka
-
line batteries of the same type only; do not use rechargeable batteries.
2. Position both units next to each other. The weather station will nd
the signal from the sensor within three minutes. If the sensor signal
is not found, hold the CHANNEL button to repeat the search.
3. If the external temperature value vanishes from the display, push
theRESET button on the weather station. The weather station resets
all values to zero and nds the sensor signal again.
4. We recommend positioning the sensor on the northern side
of the house. In built-up areas, the sensor range may drop rapidly.
5. The sensor is resistant to splash and dripping water; do not subject
it to permanent contact with adverse weather and rain.
6. Do not put the sensor on metal surfaces; it might weaken the signal.
7. If the weak battery icon (D eld) appears, replace the batteries in the
sensor or the weather station.
Channel change and connecting more sensors
1. Use the CHANNEL button on the rear of the weather station to choose
the desired sensor channel - 1, 2 or 3. Then hold the CHANNEL button
until the icon starts blinking.
2. On the rear side of the sensor, remove the battery compartment cover
and insert the batteries (2× AAA).
3. Set the required number of the sensor channel - 1, 2, 3 using the CH
button – it will be shown on the front display. Within 3 minutes the
data from the sensor will be read.
4. If the sensor signal is not found, remove the battery and reinsert.
Radio controlled clock (DCF77)
After logging to the wireless sensor, the weather station starts to automa-
tically search for the DCF77 signal over 7 minutes, the L icon is blinking.
During the search no data on the display are updated and the buttons do
not function (except SNOOZE/LIGHT).
Signal found – the icon stops blinking and it shows the current time.
Signal not found – the icon disappears.
To start a new search for the DCF77 signal push the buttons + and – at
the same time.
To cancel the DCF77 signal search, push the buttons + and – at the same
time again.
The DCF77 signal will be synchronised daily between 2:00 and 3:00 a.m.
To ensure correct signal reception, do not place the sensor near electrical
appliances and mobile phones.
Manual setting of the time, date and location to
show the time of sunrise, sunset, moonrise and
moonset
1. Hold the MODE button
2. Use the buttons + and – to set the year – month - day – time shift – day
language - 12/24 time format – hour – minute – city (country) code.
Other cities and countries are listed on page 22 - 23.
3. The week number is set automatically according to the set date.
4. You can move from one value to another by pushing the MODE button.
5. After setting the city code, the weather station will set the time of
sunrise and sunset (R eld) and moonrise, moonset (O eld).
Interior and exterior temperatures, humidity,
temperature unit
The interior temperature and humidity is displayed in eld I.
Exterior temperature and humidity is displayed in eld H.
Button – choose the temperature unit °C/°F.
Temperature and humidity trend
The arrow shows the trend in the measured values of temperature (F icon)
and humidity (G icon) for the specic sensor or station.
Indicators on the
display
Temperature and humi-
dity trend
Rising Stable Falling
Prenesi priročnik v slovenščini (PDF, 1.02 MB)
(Upoštevajte okolje in natisnite ta priročnik le, če je res potrebno)

Loading…

Ocena

Povejte nam, kaj menite o EMOS E5018 Vremenska postaja, tako da oddate oceno izdelka. Ali želite deliti svoje izkušnje z izdelkom ali postaviti vprašanje? Oddajte komentar na dnu strani.
Ali ste zadovoljni z EMOS E5018 Vremenska postaja?
Da Ne
67%
33%
12 glasovi

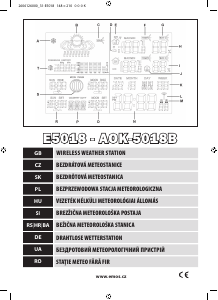
Pridružite se pogovoru o tem izdelku

Tukaj lahko delite svoje mnenje o EMOS E5018 Vremenska postaja. Če imate vprašanje, najprej natančno preberite priročnik. Zahtevo za priročnik lahko opravite z uporabo našega kontaktnega obrazca.

Alexa 25-04-2021
Izdelek mi je zelo všeč, vendar piska v določenih intervalih, kar je ponoči precej moteče ... Vem, da nekaj nakazuje, ampak res ne ugotovim kaj točno in nikjer ne najdem načina, kako bi piskanje ustavil. ne cvrči ves čas, samo eno, a se tudi jaz žal ne morem navaditi. Hvala za odgovor :)

odgovori | To je bilo koristno (0) (Prevedel Google)

Več o tem priročniku

Zavedamo se, da je lepo imeti papirni priročnik za vaš EMOS E5018 Vremenska postaja. Priročnik lahko vedno prenesete z naše spletne strani in ga natisnete sami. Če želite imeti originalni priročnik, priporočamo, da kontaktirate EMOS. Morda bodo lahko zagotovili originalni priročnik. Ali iščete priročnik za vaš EMOS E5018 Vremenska postaja v drugem jeziku? Na naši domači strani izberite želeni jezik in poiščite številko modela, da preverite, ali je na voljo.

Specifikacije

Blagovna znamka EMOS
Model E5018
Kategorija Vremenske postaje
Vrsta datoteke PDF
Velikost datoteke 1.02 MB

Vsi priročniki za EMOS Vremenske postaje
Več priročnikov za Vremenske postaje

Pogosto zastavljena vprašanja o EMOS E5018 Vremenska postaja

Naša podporna ekipa išče uporabne informacije o izdelkih in odgovore na pogosta vprašanja. Če v pogosto postavljenih vprašanjih odkrijete nenatančnost, nam to sporočite prek obrazca za stik.

Moja vremenska postaja je napovedovala, da bo deževalo, vendar se to ni zgodilo. Zakaj to? Potrjeno

Napoved vremenske postaje temelji na zračnem tlaku. Na splošno nizek tlak pomeni slabo vreme, visok tlak pa dobro vreme. Možno je, da se vremenski vzorec razvije drugače, kot napoveduje zračni tlak.

To je bilo koristno (1404) Preberi več

Katera je najboljša lokacija za vremensko postajo in njene senzorje? Potrjeno

Vremenska postaja je nameščena v njej in jo je treba hraniti stran od virov toplote, kot so kuhinja, okna ali električni aparati. Ločen senzor zunanje temperature mora biti postavljen v senco in najmanj 1,25 m nad tlemi. Senzor za dež je treba postaviti na odprto območje, kjer lahko vedno zbira dež. Tudi senzor za veter mora biti nameščen na odprtem območju, pri čemer vse ovire vplivajo na veter.

To je bilo koristno (334) Preberi več

Moja vremenska postaja ima merilnik dežja, ali lahko meri tudi količino snežnih padavin? Potrjeno

Nekateri merilniki dežja so opremljeni z grelnim elementom, zaradi česar se sneg topi in omogoča njegovo merjenje. Brez grelnega elementa se bo merilnik dežja zamašil in meritev ni mogoče izvesti.

To je bilo koristno (235) Preberi več

Baterija v moji napravi je oksidirana, ali jo lahko še vedno varno uporabljam? Potrjeno

Ja, napravo je še vedno mogoče varno uporabljati. Najprej odstranite oksidno baterijo. Za to nikoli ne uporabljajte golih rok. Nato predelek za baterije očistite z vatirano palčko, namočeno v kis ali limonin sok. Pustite, da se posuši, in vstavite nove baterije.

To je bilo koristno (234) Preberi več

Ali lahko v napravi dlje časa pustim zamenljivo baterijo? Potrjeno

Zamenljive baterije lahko v napravi ostanejo dlje časa, če jo uporabljate. Če napravo hranite dlje časa, je priporočljivo odstraniti baterije, da preprečite oksidacijo.

To je bilo koristno (234) Preberi več
Priročnik EMOS E5018 Vremenska postaja

Podobni izdelki

Sorodne kategorije