
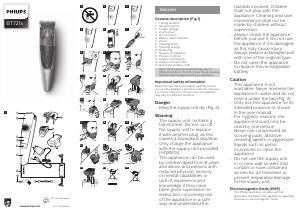
General
- The appliance is suitable for mains voltages
ranging from 100 to 240 volts.
- The supply unit transforms 100-240 volts to a
safe low voltage of less than 24 volts.
- Maximum noise level: Lc = 75 dB(A).
Display
Battery status indications
When the battery is almost empty, the battery
charge indicator ashes orange (Fig. 3).
When the appliance is charging, the battery charge
indicator ashes white (Fig. 4).
When the battery is fully charged, the battery
charge indicator lights up white continuously (Fig. 5).
Note: The lights switch o automatically after
30 minutes.
Hair length indications
The selected hair length setting will light up on the
front of the handle when you select the desired
length setting with the zoom wheel (Fig. 6).
Charging
Charging takes approx. 1 hour. Charge the
appliance before you use it for the rst time and
when the display indicates that the battery is
almost empty.
1 Make sure the appliance is switched o.
2 Put the adapter in the wall socket and put the
small plug in the appliance (Fig. 7).
3 After charging, remove the adapter from the
wall socket and pull the small plug out of the
appliance.
When the appliance is fully charged, it has a
cordless operating time of up to 75 minutes.
Using the appliance
Note: This appliance can be used without cord or
directly from the power outlet.
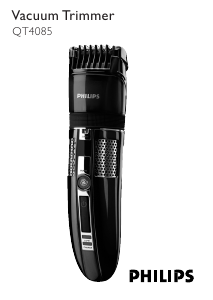
You can use this appliance for a stubble and
a short beard. This appliance has an integrated
vacuum system that catches cut beard hair for
a less mess trimming experience.
The vacuum system is activated automatically as
soon as you switch on the appliance.
Note: Switch o and clean the appliance after
each use.
Switching the appliance on and o
Press the on/o button once to switch the
appliance on or o (Fig. 8).
Trimming without comb
- You can use the appliance without beard and
stubble comb to trim hair close to the skin or
to contour the neckline and sideburns. To trim
hair close to the skin, place the at side of the
trimming head against your skin and make
strokes in the desired direction (Fig. 9).
- For contouring hold the trimming head
perpendicular to the skin and move the
trimming head upwards or downwards with
gentle pressure (Fig. 10).
- You can use the precision trimmer to create
ne lines and contours around your facial style,
close to the skin (Fig. 11). Simply pull the cutting
element straight o (Fig. 12) and insert the
precision trimmer (Fig. 13).
Trimming with comb
Note: When you trim for the rst time, start at the
highest length setting to familiarise yourself with
the appliance.
- You can use the beard and stubble comb
attached to the cutting element to groom your
beard and moustache in your preferred style.
For the beard and stubble comb, you can turn
the zoom wheel to choose from 20 length
settings ranging from 0.5mm to 10mm in steps
of 0.5mm (Fig. 6).
- You can use the precision trimmer with a detail
comb attached for precision trimming of your
sideburns, moustache or beard (Fig. 14).
Note: Switch o and clean the appliance after
each use.
1 Attach the detail comb (Fig. 15) or the beard
and stubble comb onto the appliance (Fig. 16).
2 Switch on the appliance.
3 To trim most eectively, move the appliance
against the hair growth direction (Fig. 17). Make
sure that the surface of the comb always stays
in contact with the skin.
Cleaning and maintenance
Cleaning the appliance
Note: Only the cutting element and the comb can
be cleaned with water.
We advise you to empty the hair-collection chamber
after each trimming session. When you trim long,
dense beards, it may also be necessary to empty the
hair-collection chamber during the trimming session
in order to maintain optimal suction performance.
1 Switch o the appliance and disconnect it from
the power outlet.
2
Wipe the housing of the appliance with a dry cloth.
3 Remove the comb (Fig. 18) and clean it with the
cleaning brush and/or rinse it under the tap
(Fig. 19).
4 Remove the cutting element and clean it under
the tap (Fig. 20). Shake o excess water and
leave to dry completely.
Caution: Never dry the cutting element with a
towel or tissue, as this may damage the trimming
teeth.
5 Shake and/or brush out the hairs that have
collected in the hair chamber (Fig. 21, Fig. 22).
6 After cleaning, reattach the cutting element
(Fig. 23) and comb (Fig. 16) to the appliance.
Recycling
- This symbol means that this product shall not
be disposed of with normal household waste
(2012/19/EU) (Fig. 24).
- This symbol means that this product contains a
built-in rechargeable battery which shall not be
disposed of with normal household waste (Fig. 25)
(2006/66/EC). We strongly advise you to take
your product to an ocial collection point or
a Philips service centre to have a professional
remove the rechargeable battery.
- Follow your country’s rules for the separate
collection of electrical and electronic products
and rechargeable batteries. Correct disposal
helps prevent negative consequences for the
environment and human health.
Warranty and support
If you need information or support, please
visit www.philips.com/support or read the
international warranty leaet.
EESTI
Üldine kirjeldus (Joon. 1)
1 Lõiketera
2 Vaakumsüsteem
3 Pikkusastmed
4 Reguleerimisratas
5 Toitenupp
6 Aku oleku näidik
7 Kott
8 Puhastusharjake
9 Puhastuslapp
10 Väike pistik
11 Toiteplokk (adapter)
12 Täppispiirel
13 Täppiskamm 5 mm (L)
14 Täppiskamm 3 mm (M)
15 Habeme- ja tüükakamm
Märkus. Toote juurde kuuluvad tarvikud võivad
olenevalt tootest erineda. Karbil on näidatud
tarvikud, mis teie seadmega kaasas käivad.
Tähtis ohutusteave
Enne seadme ja selle tarvikute kasutamist lugege
antud oluline teave hoolikalt läbi ja hoidke see
edaspidiseks alles. Kaasaskäivad tarvikud võivad
vastavalt tootele erineda.
Oht
- Hoidke toiteplokk kuivana
(joon. 2).
Hoiatus
- Toiteplokis on trafo. Ärge
lõigake toiteplokki ära,
et asendada seda mõne
teise pistikuga, kuna see
põhjustab ohtliku olukorra.
- Kasutage seadme laadimiseks
ainult kaasasolevat toiteplokki
(HQ8505).
- Seda seadet võivad kasutada
lapsed alates 8. eluaastast
ning füüsiliste puuete ja
vaimuhäiretega isikud või
isikud, kellel puuduvad
kogemused ja teadmised,
kui neid valvatakse või neile
on antud juhendid seadme
ohutu kasutamise kohta
ja nad mõistavad sellega
seotud ohte. Lapsed ei tohi
seadmega mängida. Ärge
laske lastel seadet puhastada
ja hooldada järelvalveta.
- Kontrollige alati enne seadme
kasutamist selle korrasolekut.
Vigastuste vältimiseks ärge
kasutage seadet, kui see
on kahjustatud. Vahetage
alati kahjustatud osa
originaalvaruosa vastu välja.
- Ärge avage seadet, et
laetavaid akusid ise välja
vahetada.
Ettevaatust
- See seade pole pestav. Ärge
kunagi kastke seadet vette ega
loputage kraani all (joon. 2).
- Kasutage seda seadet üksnes
selleks ettenähtud otstarbel
kasutusjuhendi kohaselt.
- Hügieenilistel põhjustel
peaks seadet ainult üks isik
kasutama.
- Ärge kunagi kasutage seadme
puhastamiseks suruõhku,
küürimiskäsna, abrasiivseid
puhastusvahendeid ega ka
sööbivaid vedelikke nagu
bensiin või atsetoon.
- Toiteploki pöördumatu
kahjustamise vältimiseks,
ärge kasutage seda


Pridružite se pogovoru o tem izdelku
Tukaj lahko delite svoje mnenje o Philips BT7210 Prirezovalnik brade. Če imate vprašanje, najprej natančno preberite priročnik. Zahtevo za priročnik lahko opravite z uporabo našega kontaktnega obrazca.