HR1883
HR1884
Specifications are subject to change without notice
© 2015 Koninklijke Philips N.V.
All rights reserved.
4241 210 20291
English
1 Your juicer
Congratulations on your purchase, and welcome to Philips!
To fully benet from the support that Philips offers, register your product at
www.philips.com/welcome. Read this user manual carefully before you install and use the unit.
Save it for future reference.
2 Important
Read this user manual carefully before you use the appliance, and save it for future reference.
Danger
• Do not immerse the main unit of the juicer in water,
any other uid, nor rinse it under the tap. Use only a
moist cloth to clean.
Warning
• Check if the voltage indicated on the juicer
corresponds to the local power voltage before you
connect it.
• Do not connect the appliance to an external timer to
prevent danger.
• Only connect the juicer to a grounded power outlet.
Always make sure that the plug is inserted rmly into
the power outlet.
• Make sure that the damaged power cord is replaced
by Philips, a service center authorized by Philips or
similarly qualied persons in order to avoid a hazard.
• If you detect cracks in the sieve, the driving shaft, or
any accessories is damaged in any way, do not use the
appliance anymore and contact the nearest Philips
service center. Do not replace parts of the appliance
yourself.
• This appliance shall not be used by children.
• This appliance can be used by persons with reduced
physical, sensory or mental capabilities or lack of
experience and knowledge if they have been given
supervision or instruction concerning use of the
appliance in a safe way and if they understand the
hazards.
• For their safety, do not allow children to play with the
appliance.
• Keep the appliance and its power cord out of the
reach of children. Do not hang the power cord over
the desk or table edge, where you place the appliance.
• To prevent a short circuit or an electric shock, make
sure that your hands are dry before you insert
the plug into the power outlet and switch on the
appliance.
• Never let the appliance run unattended.
• Never reach into the feeding tube and the main
unit with your ngers or an object while the juicer
is running. Never use any objects to replace the
pusher. Keep your eyes from the feeding tube to avoid
accidents.
Caution
• This appliance is intended for household use only.
• Never use any accessories or parts from other
manufacturers or that Philips does not specically
recommend. If you use such accessories or parts, your
guarantee becomes invalid.
• Do not use this appliance on an unstable or uneven
surface.
• Before you insert the plug into the power outlet,
make sure that the appliance is assembled correctly.
• Unplug the appliance immediately after use.
• Switch off and unplug the appliance from the power
outlet after use. Wait till the main unit and the
driving shaft stop turning, then you can take out any
accessories from the main unit.
• Cut large ingredients into pieces that t into the
feeding tube. Remove stones, cores, seeds, and thick
peels in fruits or vegetables before juicing.
• Do not exert too much pressure on the pusher, since
this would affect the quality of the end result and it
could even cause the driving shaft to come to a halt.
• Food coloring can discolor components. This is normal
and has no impact on use.
• Do not use the appliance continuously for more
than 30 minutes. This is to protect the lifetime of the
appliance.
• When the appliance is stopped and cannot
automatically reverse, turn the control knob to OFF.
Then, turn the control knob to the REV position to
clear the ingredients from the appliance. Turn the
control knob to ON again to use the appliance. If it is
still blocked, clean the driving shaft before you re-use
again. This is to protect the appliance.
• To prevent damages due to heat deformation, never
use water with a temperature of over 60°C or a
sterilizer to clean all components.
• Do not use scouring pads, abrasive cleaning agents or
aggressive liquids such as petrol, alcohol or acetone to
clean the appliance.
EMF
This Philips appliance complies with all applicable standards and regulations regarding
exposure to electromagnetic elds.
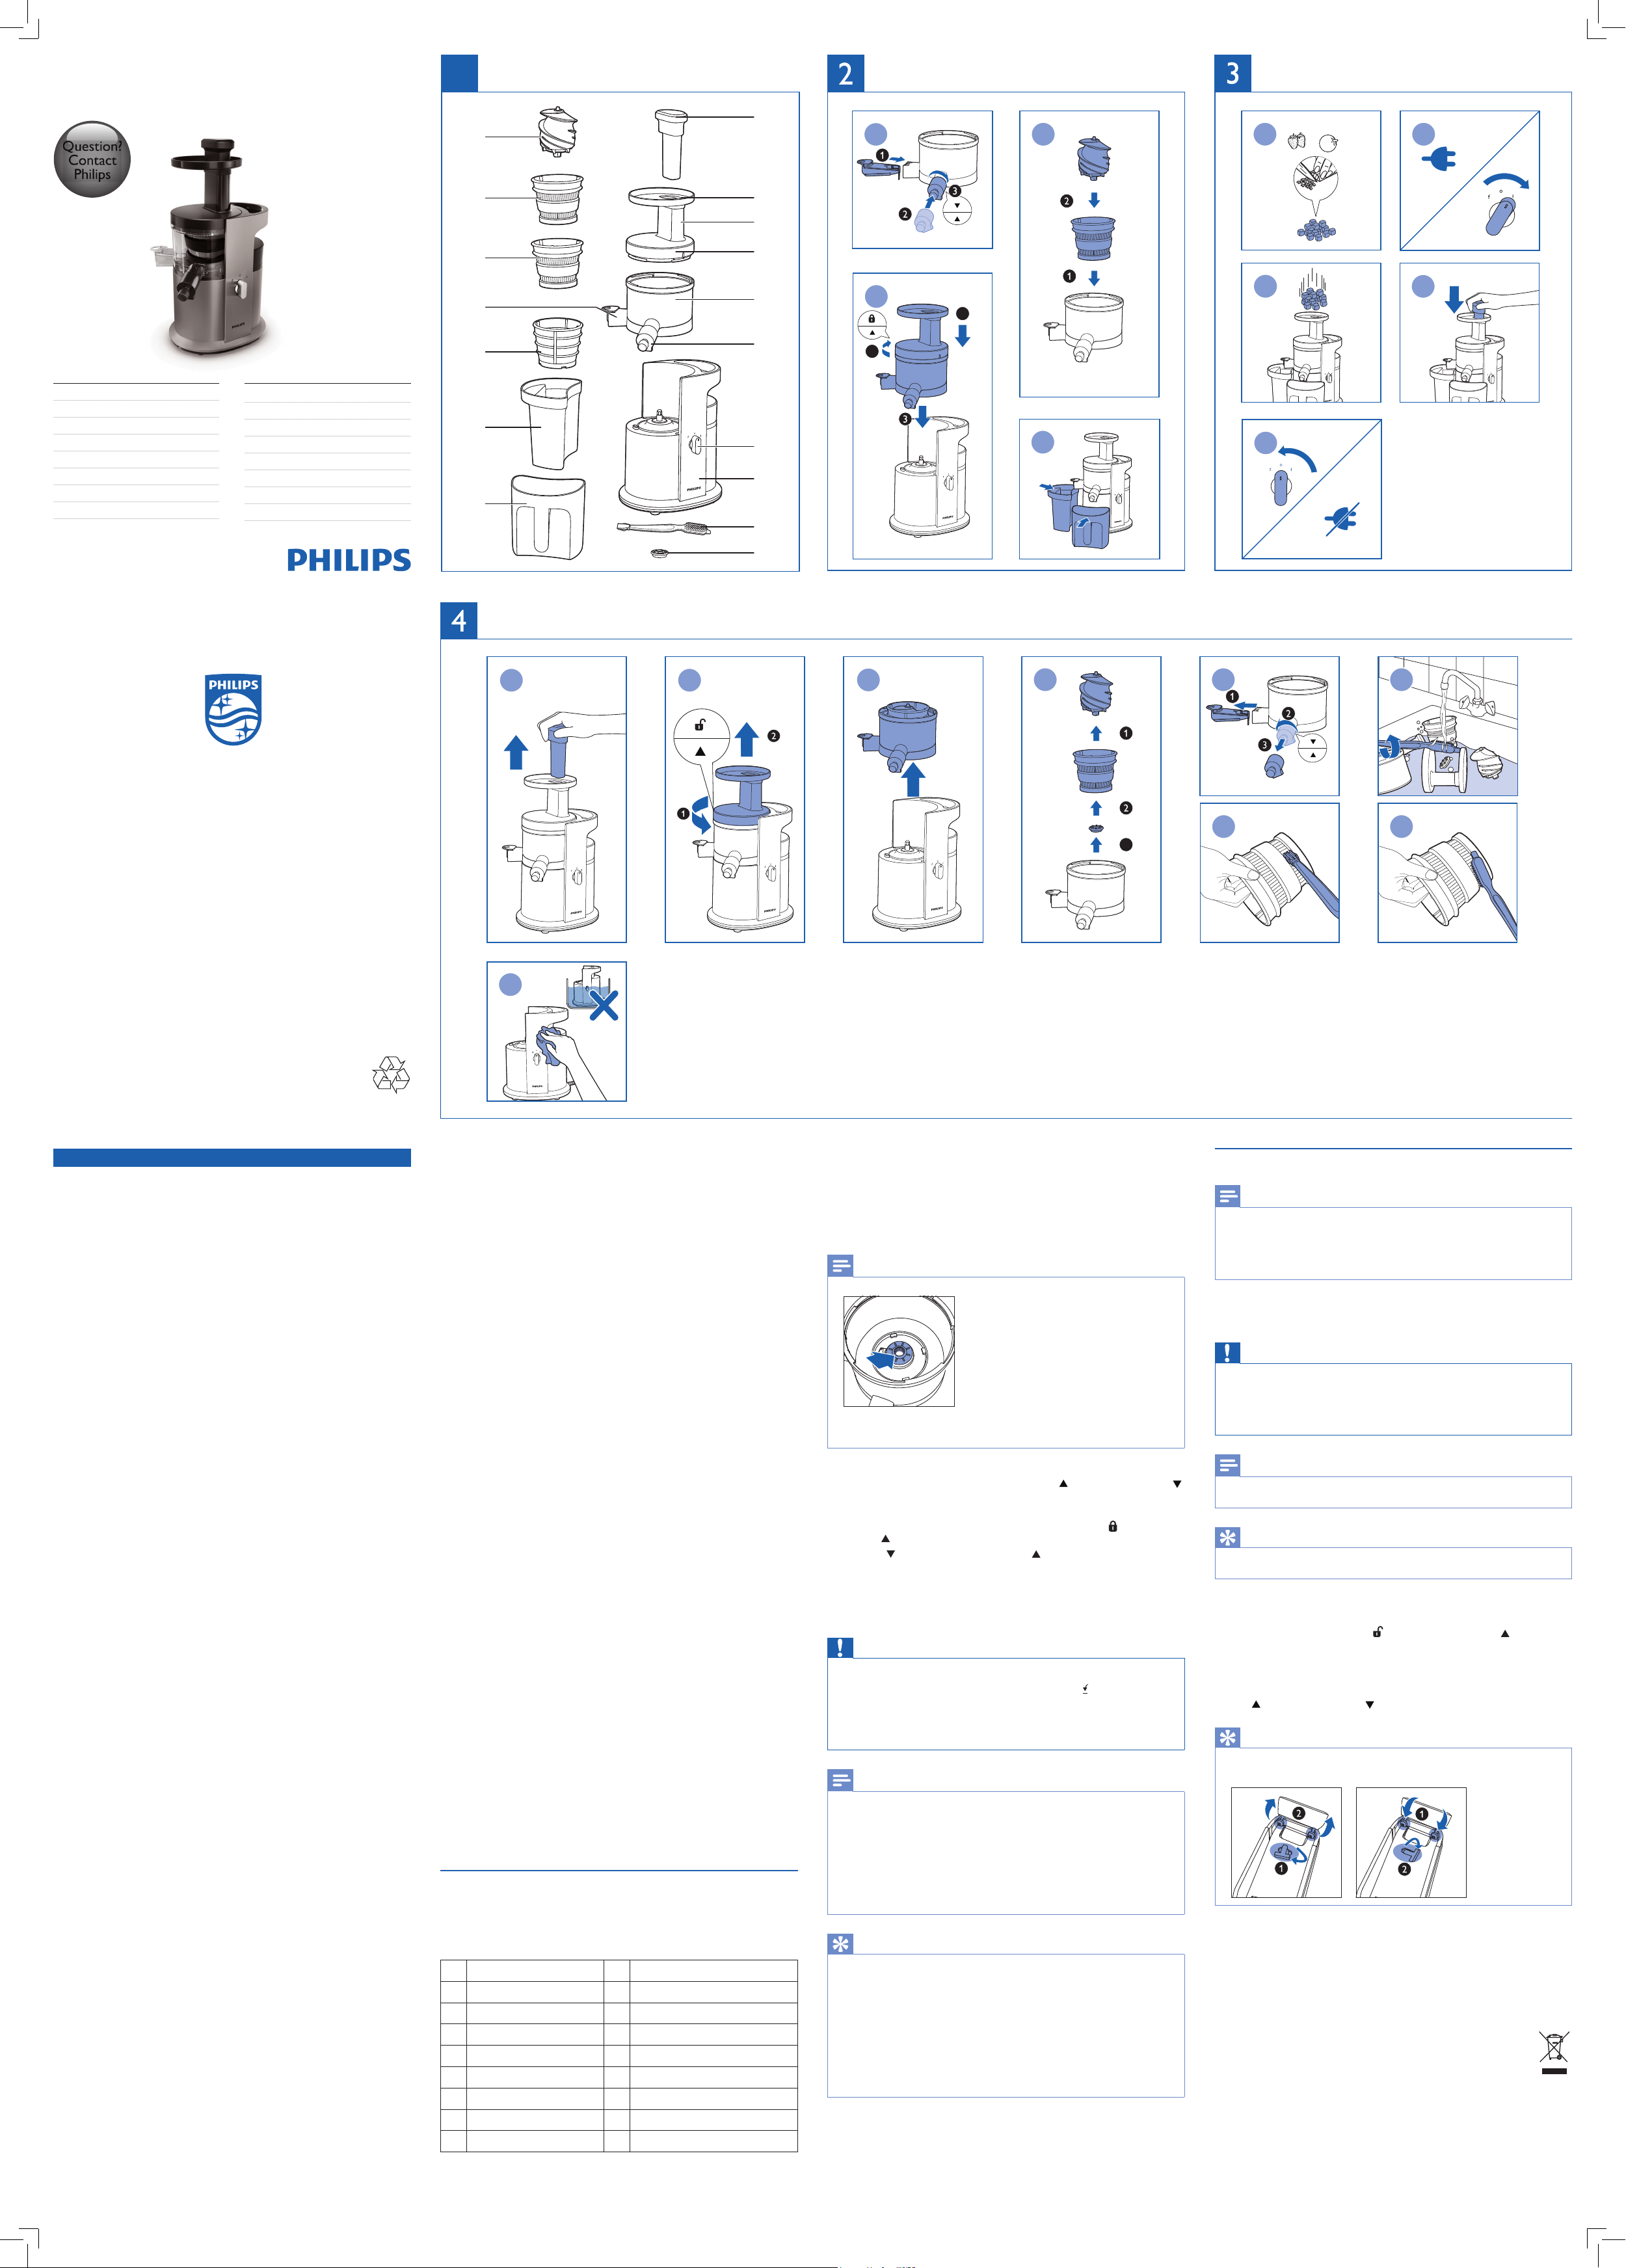
3 Overview (fig. 1)
a
Driving shaft
j
Main unit
b
Fine sieve
k
Control knob
c
Coarse sieve (HR1884 only)
l
Detachable juice spout
d
Detachable pulp spout
m
Juice collector
e
Sorbet sieve
n
Lid
f
Pulp container
o
Feeding tube
g
Juice jug
p
Tray
h
Backup sealing ring
q
Pusher
i
Cleaning brush
4 Before first use
Take out all the accessories and clean the parts of the juicer thoroughly before using it for
the rst time (see chapter “Cleaning”).
Make sure all parts are completely dry before you start using the juicer.
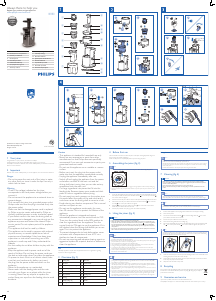
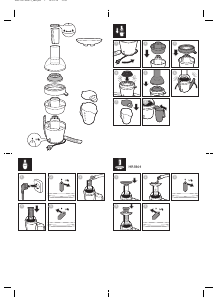
5 Assembling the juicer (fig. 2)
Note
•
Make sure the sealing ring is rmly inserted into the juice collector before using the appliance.
• If the sealing ring on the juice collector is aging or damaged, replace it with the backup sealing ring.
• There is a switch on the juice spout. Pull it outward to open the spout, and push it inward to close
the spout.
1 Insert the detachable pulp spout into the pulp outlet; Insert the detachable juice spout
into the juice outlet, turn the spout clockwise until the
icon on the spout and the
icon on the outlet are aligned.
2 Put the sieve into the juice collector rst, and then place the driving shaft into the sieve.
3 Place the lid onto the juice collector. Turn the lid clockwise until the icon on the lid
and the
icon on the juice collector are aligned.
4 Align the icon on the juice collector and the icon on the main unit, and then
insert the juice collector into the main unit.
5 Put the pulp container and juice jug under the outlets respectively.
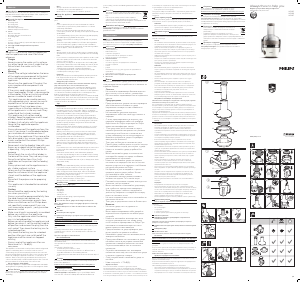
6 Using the juicer (fig. 3)
Caution
•
Never insert your ngers or an object into the feeding tube.
• When the appliance is stopped and cannot automatically reverse, turn the control knob to the
off position “O”. Then, turn the control knob to the reverse position “
” to clear the ingredients
from the appliance. Turn the control knob to “I” again to use the appliance. If it is still blocked,
clean the driving shaft and remove food residues in it before you re-use again. This is to protect
the appliance.
• Do not exert too much pressure on the pusher, as this could affect the quality of the end result
and it could even cause the driving shaft to come to a halt.
Note
•
The appliance will only function if all parts have been properly assembled and the lid has been
properly locked in place with the juice collector.
• Before juicing, make sure that the detachable pulp spout is assembled properly, and the juice jug and
pulp container are put under the corresponding spouts.
• Cut the ingredients into pieces that t into the feeding tube.
• The coarse sieve is more suitable to juice soft fruits or vegetables such as tomatoes and berries.
• During processing, the appliance may vibrate slightly. This is normal.
• To prevent juice from dripping onto the table, push the spout switch inward to close the spout
before moving the juice jug from under the juice outlet.
• Drink the juice immediately after you have extracted it. If it is exposed to air for some time, the juice
loses its taste and nutritional value.
Tip
•
Use fresh fruit and vegetables, as they contain more juice. Fruits like apples, pears, pineapples, grapes,
pomegranates, oranges and melons, and vegetables like carrots, cucumbers, tomatoes, celery stalks
are suitable for processing in the juicer.
• When juicing a large amount of hard fruits or vegetables such as carrots, celery stalks and spinach,
the rubber pad on the juice collector might be pushed open, and the appliance might be blocked. To
help avoid the situation, cut the fruits or vegetables into small cubes or pieces.
• Remove thick peels, e.g. those of pineapples, oranges and pomegranates. You do not have to remove
thin peels or skins
• If you want to juice fruits with stones, such as peach, plum or cherry, remove the stone before juicing.
• The juicer is not suitable for processing very hard and/or brous fruits or vegetables such as sugar
cane. Very soft and/or starchy fruits, such as bananas, papayas, avocados, gs and mangoes are also
not suitable for processing in the juicer. For very soft fruits, you can freeze them in the refrigerator
and use the sorbet sieve to make sorbet.
Using the sorbet sieve
Note
•
Replace the ne/coarse sieve with the sorbet sieve before use.
• Make sure to remove the detachable pulp spout before use.
• Peel the fruits and remove the cores. Cut them into small cubes rst (around 2cm x 2cm), and then
put them in the refrigerate. Freeze the fruits in the refrigerator for at least 10 hours before making
sorbet in the juicer.
• Push the switch inward to close the juice spout when using the sorbet sieve.
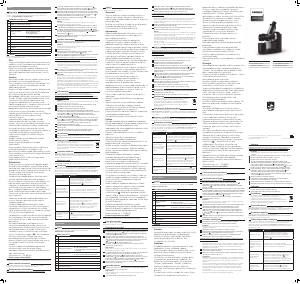
7 Cleaning (fig. 4)
Cautions
•
Before cleaning, make sure the appliance is switched off and the sieve has stopped rotating.
• Never use scouring pads, abrasive cleaning agents or aggressive liquids such as alcohol, petrol or
acetone to clean the appliance.
• Never immerse the motor unit in water nor rinse it under the tap.
• Do not clean the sieve with your hands to avoid getting cut. Use the provided brush for this
matter.
Note
•
Apart from the main unit, lid, pusher, and the brush, all the other parts are dishwasher proof.
• Wipe the appliance with a soft cloth and make sure the appliance is clean and dry before storage.
Tip
•
The appliance is easier to clean if you do so immediately after use.
• Use both ends of the cleaning brush to poke out the pulp stuck in the detachable parts.
1 Switch off the appliance and unplug it. Wait until the sieve has stopped rotating.
2 Take out the pusher.
3 Turn the lid anti-clockwise until the icon on the lid aligns with the icon on the
juice collector, and then remove the lid.
4 Remove the juice collector from the main unit.
5 Take out the driving shaft, sieve and sealing ring.
6 Pull out the detachable pulp spout; Turn the detachable juice spout anti-clockwise until
the
icon on the spout and the icon on the outlet are aligned, then pull it out.
Tip
•
To detach the rubber pad on the detachable pulp spout, pull the pad out of the two retaining slots rst,
and then take the other side of the rubber pad out; To reattach it, x the rubber pad into the retaining
slots rst, and then insert the other side into the spout.
7 Clean the detachable parts with the provided cleaning brush in warm water with some
washing-up liquid and rinse them under the tap.
8 Use the silicone end of the cleaning brush to wipe off the pulp on the sieve, and then
brush away the pulp stuck in the holes.
9 Wipe the main unit with a damp cloth.
8 Recycling
Do not throw away the appliance with normal household waste at the end of its life,
but hand it in at an ofcial collection point for recycling. By doing this, you help to
preserve the environment.
9 Guarantee and service
If you have a problem, need service or need information, see
www.philips.com/support or contact the Philips Consumer Care Center in your country.
1
3
2
4
3
7 8
1 2
6
9
a
b
c
e
m
d
f
g
q
o
p
n
k
j
i
h
l
1
2
4
3
4
5
1
2
3
5
Register your product and get support at
www.philips.com/welcome
Question?
Contact
Philips
Always there to help you
1/5
EN User manual
BG Ръководство за потребителя
CS Příručka pro uživatele
ET Kasutusjuhend
HR Korisnički priručnik
HU Felhasználói kézikönyv
KK Қолданушының нұсқасы
LT Vartotojo vadovas
LV Lietotāja rokasgrāmata
PL Instrukcja obsługi
RO Manual de utilizare
RU Руководство пользователя
SK Príručka užívateľa
SL Uporabniški priročnik
SR Korisnički priručnik
UK Посібник користувача


Pridružite se pogovoru o tem izdelku
Tukaj lahko delite svoje mnenje o Philips HR1883 Sokovnik. Če imate vprašanje, najprej natančno preberite priročnik. Zahtevo za priročnik lahko opravite z uporabo našega kontaktnega obrazca.